Linked List
链表是一种通过指针串联在一起的线性结构,每一个节点由两部分组成,一个是数据域一个是指针域(存放指向下一个节点的指针),最后一个节点的指针域指向null(空指针的意思)。
链表的入口节点称为链表的头结点也就是head。
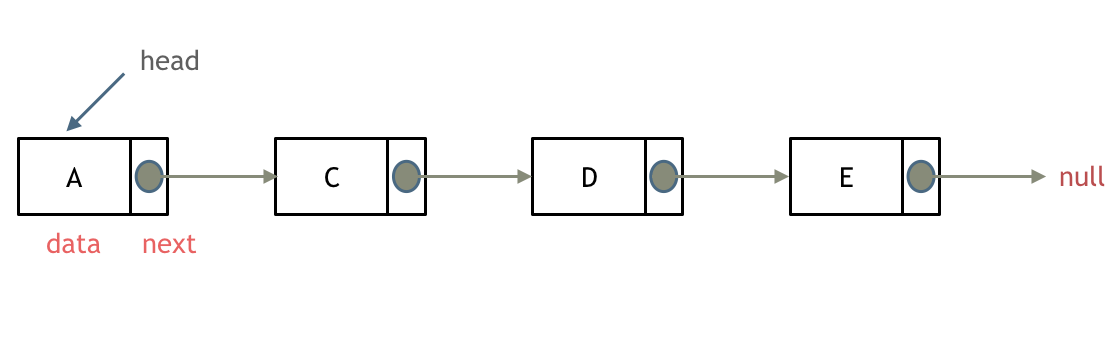
链表是通过指针域的指针链接在内存中各个节点。
相较于数组在内存中的连续存储,链表在内存中的存储是不连续的,所以在插入和删除元素时,不需要移动其他元素的地址,时间复杂度是$O(1)$。但是链表的查询时间复杂度是$O(n)$。
| 数据结构 | 插入/删除(时间复杂度) | 查询(时间复杂度) | 适用场景 |
|---|---|---|---|
| 数组 | O(n) | O(1) | 数据量固定,频繁查询,较少增删 |
| 链表 | O(1) | O(n) | 数据量不固定,频繁增删,较少查询 |
Linked List Types
- 单链表(Single Linked List):每个节点只有一个指针域,指向下一个节点。
- 双向链表(Double Linked List):每个节点有两个指针域,一个指向前一个节点,一个指向下一个节点。
- 循环链表(Circular Linked List):尾节点指向头结点形成一个环。
Linked List Definition
// 单链表
struct ListNode {
    int val;  // 节点上存储的元素
    ListNode *next;  // 指向下一个节点的指针
    ListNode(int x) : val(x), next(nullptr) {}  // 节点的构造函数
};

// Use Custom Constructor
ListNode* head = new ListNode(5);  // 创建一个值为5的头结点

// Use Default Constructor
ListNode* head = new ListNode();
head->val = 5;
Linked List Operations
- Get the Length of Linked List
- Search Linked List Elements
- Modify Linked List Elements
- Remove Linked List Elements
- Add Linked List Elements
Remove Linked List Elements
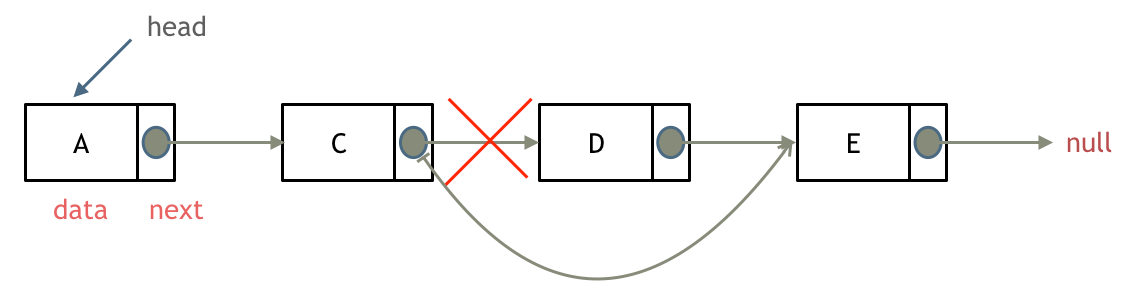
找到要删除节点的前一个节点,将前一个节点的指针指向要删除节点的下一个节点。
Add Linked List Elements
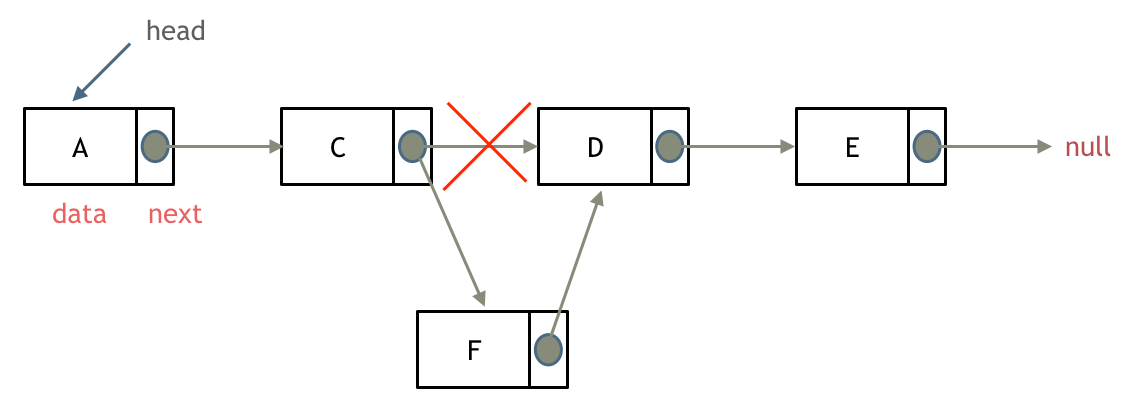
找到要添加节点的前一个节点,将前一个节点的指针指向要添加节点,要添加节点的指针指向前一个节点的下一个节点。
203. Remove Linked List Elements
Description
Given the head of a linked list and an integer val, remove all the nodes of the linked list that has Node.val == val, and return the new head.
Example 1:
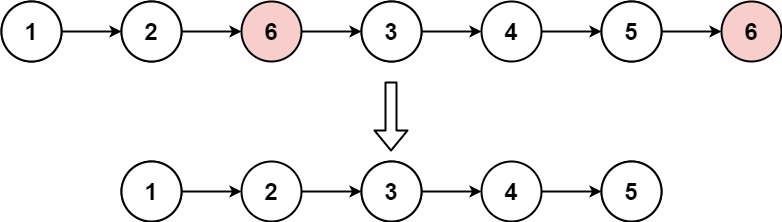
Input: head = [1,2,6,3,4,5,6], val = 6
Output: [1,2,3,4,5]
Example 2:
Input: head = [], val = 1
Output: []
Example 3:
Input: head = [7,7,7,7], val = 7
Output: []
Constraints:
- The number of nodes in the list is in the range $[0, 10^4]$.
1 <= Node.val <= 500 <= val <= 50
Solution
如上方所说,删除节点需要找到要删除节点的前一个节点,将前一个节点的指针指向要删除节点的下一个节点。
这里使用一个dummy节点,dummy节点的next指向head,这样dummy节点就是要删除节点的前一个节点。
此外,为了避免内存泄漏,需要释放要删除节点和dummy节点的内存。
/**
 * Definition for singly-linked list.
 * struct ListNode {
 *     int val;
 *     ListNode *next;
 *     ListNode() : val(0), next(nullptr) {}
 *     ListNode(int x) : val(x), next(nullptr) {}
 *     ListNode(int x, ListNode *next) : val(x), next(next) {}
 * };
 */
class Solution {
public:
    ListNode* removeElements(ListNode* head, int val) {
        ListNode* dummy_head = new ListNode(0, head);
        ListNode* pre = dummy_head;
        while (pre->next) {
            if (pre->next->val == val) {
                ListNode* tmp = pre->next;
                pre->next = tmp->next;
                delete tmp;
            } else {
                pre = pre->next;
            }
        }
        head = dummy_head->next;
        delete dummy_head;
        return head;
    }
};
CPP Note
-> VS . Operator
-> is used to access the members of a structure or union through a pointer.. is used to access the members of a structure or union through a variable.
Example:
#include <iostream>

struct MyStruct {
    int value;
    void print() {
        std::cout << "Value: " << value << std::endl;
    }
};

int main() {
    MyStruct obj;       // 结构体对象
    obj.value = 10;     // 使用 . 访问成员
    obj.print();        // 使用 . 调用成员函数

    MyStruct* ptr = &obj; // 结构体指针
    ptr->value = 20;      // 使用 -> 访问成员
    ptr->print();         // 使用 -> 调用成员函数

    return 0;
}
| Operator | Description | Example |
|---|---|---|
. | 直接访问结构体对象的成员 | obj.member |
-> | 通过结构体指针访问结构体的成员 | ptr->member(相当于 (*ptr).member) |
delete VS free Operator
| 特性 | delete | free |
|---|---|---|
| 适用语言 | 仅用于 C++ | 用于 C 和 C++ |
| 分配方式 | 与 new 配合使用,用于释放动态分配的对象 | 与 malloc / calloc 配合使用 |
| 调用构造/析构函数 | 调用对象的析构函数(如果有) | 不会调用析构函数 |
| 释放内容 | 释放对象所占的内存并处理关联资源 | 仅释放分配的内存,不做其他操作 |
| 安全性 | 提供更多的类型安全(强类型检查) | 不进行类型检查 |
在 C++ 中,delete 和 free 都用于释放内存,但它们之间有一些关键的区别,主要体现在适用场景、执行的操作以及适用的编程语言特性。
使用场景
delete
用于释放通过 new 分配的动态对象。
自动调用对象的析构函数,适用于具有复杂数据结构或类的对象。
*Example:
#include <iostream>

class MyClass {
public:
    MyClass() { std::cout << "Constructor called\n"; }
    ~MyClass() { std::cout << "Destructor called\n"; }
};

int main() {
    MyClass* obj = new MyClass(); // 动态分配
    delete obj;                  // 释放内存,同时调用析构函数
    return 0;
}
free
用于释放通过 malloc 或 calloc 分配的内存。
不会调用析构函数,仅仅释放内存。
Example:
#include <cstdlib>
#include <iostream>

int main() {
    int* arr = (int*)malloc(5 * sizeof(int)); // 动态分配
    if (arr == nullptr) {
        std::cout << "Memory allocation failed\n";
        return 1;
    }
    free(arr); // 释放内存,不涉及析构函数
    return 0;
}
智能指针替代
C++ 中推荐使用智能指针(如 std::shared_ptr 和 std::unique_ptr),可以避免手动调用 delete 或 free 的风险。
Example:
#include <memory>
#include <iostream>

class MyClass {
public:
    MyClass() { std::cout << "Constructor called\n"; }
    ~MyClass() { std::cout << "Destructor called\n"; }
};

int main() {
    std::unique_ptr<MyClass> ptr = std::make_unique<MyClass>(); // 自动管理内存
    // 无需手动 delete,超出作用域时会自动释放内存并调用析构函数
    return 0;
}
707. Design Linked List
Description
Design your implementation of the linked list. You can choose to use a singly or doubly linked list.
A node in a singly linked list should have two attributes: val and next. val is the value of the current node, and next is a pointer/reference to the next node.
If you want to use the doubly linked list, you will need one more attribute prev to indicate the previous node in the linked list. Assume all nodes in the linked list are 0-indexed.
Implement the MyLinkedList class:
MyLinkedList()Initializes theMyLinkedListobject.int get(int index)Get the value of the $index^{th}$ node in the linked list. If the index is invalid, return-1.void addAtHead(int val)Add a node of valuevalbefore the first element of the linked list. After the insertion, the new node will be the first node of the linked list.void addAtTail(int val)Append a node of valuevalas the last element of the linked list.void addAtIndex(int index, int val)Add a node of valuevalbefore the $index^{th}$ node in the linked list. Ifindexequals the length of the linked list, the node will be appended to the end of the linked list. Ifindexis greater than the length, the node will not be inserted.void deleteAtIndex(int index)Delete the $index^{th}$ node in the linked list, if the index is valid.
Example 1:
Input
["MyLinkedList", "addAtHead", "addAtTail", "addAtIndex", "get", "deleteAtIndex", "get"]
[[], [1], [3], [1, 2], [1], [1], [1]]
Output
[null, null, null, null, 2, null, 3]

Explanation
MyLinkedList myLinkedList = new MyLinkedList();
myLinkedList.addAtHead(1);
myLinkedList.addAtTail(3);
myLinkedList.addAtIndex(1, 2);    // linked list becomes 1->2->3
myLinkedList.get(1);              // return 2
myLinkedList.deleteAtIndex(1);    // now the linked list is 1->3
myLinkedList.get(1);              // return 3
Constraints:
0 <= index, val <= 1000- Please do not use the built-in LinkedList library.
- At most
2000calls will be made to get,addAtHead,addAtTail,addAtIndexanddeleteAtIndex.
Solution
这题的难点在于链表的操作,需要注意的是链表的增删操作,需要找到要增加节点的前一个节点。对于循环条件的判断,需要注意边界条件。
另外,链表的内存释放也是一个重要的问题,需要在析构函数中释放链表的内存。(包括野指针的释放)
对于C++类还需要多加练习,熟悉类的定义和使用。
class MyLinkedList {
public:
    struct ListNode {
        int val;
        ListNode* next;
        ListNode(int val) : val(val), next(nullptr) {}
        ListNode(int val, ListNode* next) : val(val), next(next) {}
    };

    MyLinkedList() {
        _dummy_head = new ListNode(0);
        _size = 0;
    }

    ~MyLinkedList() {
        ListNode* cur = _dummy_head;
        while (cur) {
            ListNode* temp = cur->next;
            delete cur;
            cur = temp;
        }
    }

    int get(int index) {
        if (index > (_size - 1) || index < 0) {
            return -1;
        }
        ListNode* cur = _dummy_head;
        for (int i = 0; i <= index; i++)    cur = cur->next;
        // while (index--)     cur = cur->next;
        return cur->val;
    }

    void addAtHead(int val) {
        ListNode* head = new ListNode(val);
        head->next = _dummy_head->next;
        _dummy_head->next = head;
        _size++;
    }

    void addAtTail(int val) {
        ListNode* pre = _dummy_head;
        while (pre->next)   pre=pre->next;
        pre->next = new ListNode(val);
        _size++;
    }

    void addAtIndex(int index, int val) {
        if(index > _size) return;
        if(index < 0) index = 0;
        ListNode* pre = _dummy_head;
        for (int i = 0; i < index; i++)    pre = pre->next;
        // while (index--)     pre = pre->next;
        ListNode* cur = new ListNode(val, pre->next);
        pre->next = cur;
        _size++;
    }

    void deleteAtIndex(int index) {
        if (index >= _size || index < 0) {
            return;
        }
        ListNode* pre = _dummy_head;
        for (int i = 0; i < index; i++)    pre = pre->next;
        // while (index--)     pre = pre->next;
        ListNode* tmp = pre->next;
        pre->next = pre->next->next;
        delete tmp;
        //delete命令指示释放了tmp指针原本所指的那部分内存,
        //被delete后的指针tmp的值(地址)并非就是NULL,而是随机值。也就是被delete后,
        //如果不再加上一句tmp=nullptr,tmp会成为乱指的野指针
        //如果之后的程序不小心使用了tmp,会指向难以预想的内存空间
        tmp = nullptr;
        _size--;
    }
private:
    int _size;
    ListNode* _dummy_head;
};

/**
 * Your MyLinkedList object will be instantiated and called as such:
 * MyLinkedList* obj = new MyLinkedList();
 * int param_1 = obj->get(index);
 * obj->addAtHead(val);
 * obj->addAtTail(val);
 * obj->addAtIndex(index,val);
 * obj->deleteAtIndex(index);
 */
206. Reverse Linked List
Description
Given the head of a singly linked list, reverse the list, and return the reversed list.
Example 1:

Input: head = [1,2,3,4,5]
Output: [5,4,3,2,1]
Example 2:
Input: head = [1,2]
Output: [2,1]
Example 3:
Input: head = []
Output: []
Constraints:
- The number of nodes in the list is the range
[0, 5000]. -5000 <= Node.val <= 5000
Follow up: A linked list can be reversed either iteratively or recursively. Could you implement both?
Solution
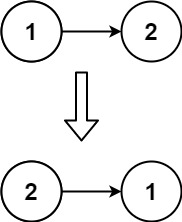
如果再定义一个新的链表,实现链表元素的反转,其实这是对内存空间的浪费。
其实只需要改变链表的next指针的指向,直接将链表反转 ,而不用重新定义一个新的链表,如图所示:
双指针迭代
/**
 * Definition for singly-linked list.
 * struct ListNode {
 *     int val;
 *     ListNode *next;
 *     ListNode() : val(0), next(nullptr) {}
 *     ListNode(int x) : val(x), next(nullptr) {}
 *     ListNode(int x, ListNode *next) : val(x), next(next) {}
 * };
 */
class Solution {
public:
    ListNode* reverseList(ListNode* head) {
        ListNode* tmp;
        ListNode* pre = nullptr;
        ListNode* cur = head;
        while (cur) {
            tmp = cur->next;
            cur->next = pre;
            pre = cur;
            cur = tmp;
        }
        return pre;
    }
};
同样,该代码需要注意循环条件的判断与返回值的设置。
递归
/**
 * Definition for singly-linked list.
 * struct ListNode {
 *     int val;
 *     ListNode *next;
 *     ListNode() : val(0), next(nullptr) {}
 *     ListNode(int x) : val(x), next(nullptr) {}
 *     ListNode(int x, ListNode *next) : val(x), next(next) {}
 * };
 */
class Solution {
public:
    ListNode* reverse(ListNode* pre, ListNode* cur) {
        if(!cur) return pre;
        ListNode* tmp = cur->next;
        cur->next = pre;
        return reverse(cur, tmp);
    }
    ListNode* reverseList(ListNode* head) {
        ListNode* pre = nullptr;
        ListNode* cur = head;
        return reverse(pre, cur);
    }
};
Complexity Analysis
两种方法的时间复杂度都是$O(n)$,但是递归方法调用了 n 层栈空间,它的空间复杂度是$O(n)$,而迭代方法的空间复杂度是$O(1)$。
Reference
代码随想录
206. Reverse Linked List
203. Remove Linked List Elements
707. Design Linked List
「如果这篇文章对你有用,请随意打赏」
 Hao Xu Blog
如果这篇文章对你有用,请随意打赏
使用微信扫描二维码完成支付